We often introduce students to probability through an informal exploration of the number line from zero to one, followed by exercises in combinatorics (counting the different outcomes). The idea is that doing this allows many students to develop strong skills in calculating and defining basic probabilities; however, using this approach can lead to conceptual weakness in the understanding of randomness. Students are taught that it is somehow 'normal' that if a dice is rolled 6 times, each number will come up once, and while this sometimes does not happen, repeating the experiment enough times will show a pattern that roughly meets this expectation. It might follow, then, that for them the fraction generated is the probability itself, rather than a value that can be used to model the distribution of a particular outcome. We've heard a great deal of criticisms about our maths curriculum lacking in depth in this country, and this may be an example: while on the surface students may be able to answer exam questions, at a deeper level it makes the concepts of random distributions and hypothesis tests much harder to grasp.
Is this the only way? An alternative approach to probability that introduces the idea of randomness as a fundamental principle rather than an unwanted by-product ( with combinatoric probability acting as an imperfect mathematical model ) affords students a significantly more robust concept of probability from which to develop more advanced mathematical skills. Perhaps it is time to move the classroom discourse about probability into the twenty-first century by taking advantage of the abilities we have now (that we didn't have decades ago when key curriculum decisions were made) to simulate and play with data through technology.
Excel is an excellent tool for simulation, and a great deal of added functionality can be taken advantage of by anyone brave enough to leap into coding Macros (sets of commands or instructions) using Visual Basic. (If you tuned out of the last sentence, this translates as 'writing lines of text into cells in the language of coding - one of which is called 'Visual Basic' - which can then simulate almost any situation with a fixed set of outcomes you fancy). While this may sound daunting, with just a few key skills you can produce surprisingly complex simulations which can provide a dynamic backdrop to theoretical probability discussions.
Key skills:
- Creating an empty Macro
- Accessing spreadsheet functions in Visual Basic
- Writing data to Cells
- Assigning a Macro to a button
- Reading data from cells
- If statements
- For loops
Over this series of instructional blogs I will introduce these skills: each blog will have an accompanying simulation which can be downloaded as a working resource, along with instructions on how to create it from scratch. The intention is that readers can use the resource while learning the underlying Visual Basic language and then develop their own examples.
Dice Roll Simulation
The first simulation is a simple dice roller. It can be produced without Macros or Visual Basic using the Randbetween function in Excel, but we will use it as an opportunity to introduce more advanced ideas. Over the next few blogs, I'll add in some more features of the dice roller to produce a more powerful, more flexible simulation.
Creating an Empty Macro
The first step is to create the Macro. In Excel 2010, navigate to the "View" tab and select "view Macro". In the window that appears, type "main" in the "Macro name" space and select Create. This name can be anything you choose, but I like to use "main" as most of the code will go in this Macro when we start producing more complex simulations later on.
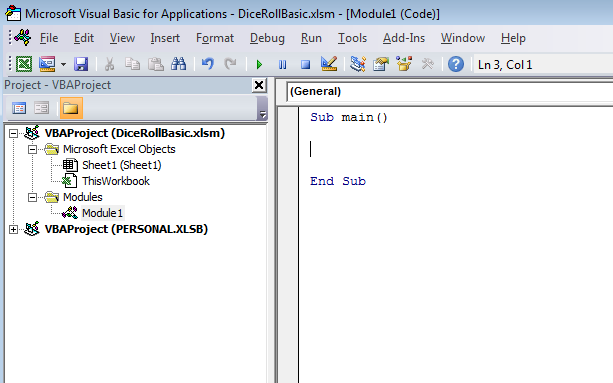
Microsoft Visual basic for Applications will appear in a new window (don't be daunted if this looks complex). A window comes up saying 'Book1 Module 1 (code) - this is the code window, where anything we write will be a command for the program to run. Your empty Macro will look like this:

All functions in VB (Visual Basic) are contained within a bucket like this; our code will be written between these two lines and then each line will be worked through in order until it reaches the line "End Sub" and stops.
Accessing spreadsheet functions in VB
In order to get access to the standard Excel functions, we must give the instruction to look in the box marked "stuff that Excel does already". To do this, use the command "WorksheetFunction" (there is a certain amount of Ronseal naming in effect). The syntax of commands (the exact order of the text you type) in VB is important because we have to explain clearly which box to look in, and then which thing to take out of the box. In this case we would write
WorksheetFunction.RandBetween(1, 6)
Why the (1, 6)? The function needs you to put the smallest and largest desirable numbers in the brackets. Helpfully, VB tries to give hints while you are coding, so as you type "Randbetween" you will see syntax hints that appear on screen. (Every function available in Excel can be used in this way).
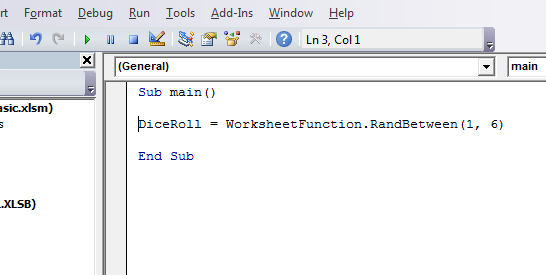
Try typing the above into the code window - you will get an error message. Why? VB is confused because it now has a random number, but not yet any idea where to put it: we need a variable! Variables are the most important part of any coding and act as a box to store things in when the code has generated them. They can have any name, so it is best to choose something that is illustrative of what you are storing; we will call the value calculated by simulating the rolling of a dice "DiceRoll". Your code should now look like this:

Congratulations: you now have a working bit of code! You can run the function and it will generate a random number between 1 and 6 (and you now know how to choose a random pupil from your class using Excel - hurrah!). At this stage the number has been created, but nothing has been done with it yet.
Writing to a cell in Excel
In order to take information from our code and display it in a cell in Excel we need two new commands: one to explain which cell we are looking in, and a second to explain which aspect of that cell to edit. Each cell has lots of information such as colour, font, text size etc. so we have to be specific. We need to add the following line to our code
Range("B2").Value = DiceRoll
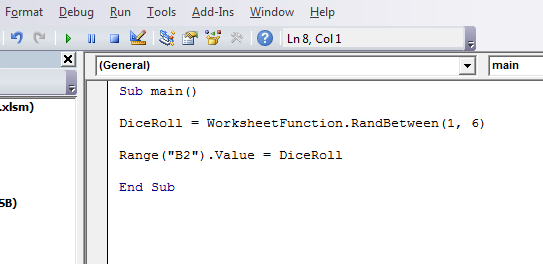
So what is going on here? Firstly "Range" tells the compiler (the program which translates the code) where to look. We are telling it to look at cell B2 by putting this information inside the bracket .in this case we are looking at cell B2. The "Value" command tells the compiler that the thing we want to change in the selected cell is the actual thing it contains. Finally "= DiceRoll" tells the compiler that the thing we want to put in the cell is the number we generated in the previous line. Your completed macro should look like this:

We now have all the code necessary to run our dice rolling simulation, but we need to set up a way to do this from inside the spreadsheet. You can now close the VB editor by pressing the 'x' in the top right-hand corner.
Assigning a Macro to a Button
In Excel, select the "insert" tab and add a shape or an image - whatever you want your button to look like. Right click on the shape and select "Assign Macro". In the list that appears, your "main" macro should be an option; select this and click ok.
Tidying up
Each time you left-click on the button you should see a new number between 1 and 6 appear in cell B2. All that is left to do is add some optional formatting (colour, text styles or pictures) to make the page look less like a boring Excel spreadsheet, then save the file as a Macro-enabled spreadsheet by clicking 'Save As Type' under the file name box and choosing 'Excel Macro-Enabled Workbook'. Well done!
In the next blog I will explain how to roll the dice multiple times and record the results in a frequency table. Here is a spreadsheet where you can see my Macro by using the "edit Macro" menu (double-click the zip file to see the spreadsheet).
As we are so often telling our pupils: don't be afraid to have a go, and ask if you get stuck. You can tweet us on @CambridgeMaths to show us your success or ask questions. Enjoy!